Core eDiscovery in Microsoft 365 Replaces In-Place eDiscovery & In-Place Hold
Microsoft announced the retirement of In-Place eDiscovery and In-Place Hold in the Exchange Admin Center (EAC) in Exchange Online in early 2020. These features have previously been used by organizations to retain and search through electronically stored information (ESI).
Before these features were retired, Microsoft provided them to let organizations search, preview and export email content from Exchange Online. These features would have previously been instrumental if your organization was to face an eDiscovery request. Alternatively, if an employee leaves your organization, but for compliance or legal purposes the mailbox is required to be retained, the In-Place Hold option would allow you to do this.
However, due to the new and improved eDiscovery functionalities now available in the Office 365 compliance centre, these features are no longer required. Given these changes, we wanted to give you a little background on In-Place eDiscovery and In-Place Hold, and what your options are to Hold/Retain Mailboxes moving forward.
What was In-Place eDiscovery in Microsoft 365?
In-Place eDiscovery was a feature in Exchange Online that allowed users to gain access to messaging records stored in the Exchange Server or Exchange Online with the right permissions. Authorized users in your Exchange Admin Center (EAC) could perform an In-Place eDiscovery search simply by selecting the mailboxes and inputting the search criteria, such as:
- keyword(s)
- start date(s)
- end date(s)
- message type(s)
- send address(es)
- recipient address(es)
- message type(s)
What was In-Place Hold in Microsoft 365?
When faced with an eDiscovery request, you may be required to preserve electronically stored information (ESI) for the duration of the case or investigation. This means you may be required to preserve all email content related to specific content, specific individuals or even across your entire organization.
This is where Exchange Online’s ‘In-Place Hold’ feature came into play. You could use In-Place Hold to place user mailboxes on hold to preserve mailboxes, as well as preserve mailbox items that have been deleted by automatic deletion processes. You could choose how long you’d like to preserve the email content, and how many mailboxes you would like to put on hold.
Need Help Transitioning to eDiscovery?
Steeves and Associates is here to help! Our team of Microsoft 365 experts will help you make a smooth transition to eDiscovery and support your team with the best practice approach. Your organization may also qualify for Microsoft FastTrack which provides eligible organizations with Microsoft 365 support at no additional cost.
Introducing Core eDiscovery in Microsoft 365
If you have relied on In-Place eDiscovery and In-Place Hold in the past and are concerned about the fact they have been retired, then don’t fear! Alternative tools in the Office 365 compliance center will allow you to do everything these tools provided and more.
Core eDiscovery is an eDiscovery tool that you can use within your organization to search and export content across Microsoft 365 applications, including Exchange Online. A Core eDiscovery search can scale across millions of locations and can be completed with more reliability than ever before. Plus, you can use the capabilities of Core eDiscovery instead of In-Place Hold to put content on hold.
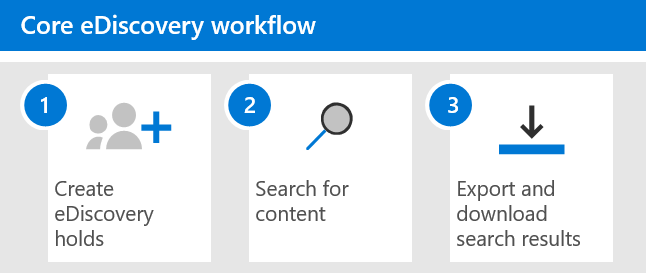
Navigating eDiscovery becomes straightforward in Microsoft 365 when you follow the Core eDiscovery 3 stage workflow:
- Create an eDiscovery hold – After you have created a new case, place an eDiscovery hold on the locations (Exchange mailboxes or SharePoint sites, for example) or individual people of interest in your investigations. This stage would have been completed by using an In-Place Hold in the past.
- Search content – Use Core eDiscoveries built-in search tool to search through the content that you have placed on hold. You can search by keywords, properties and conditions. This stage would have been previously completed using In-Place eDiscovery.
- Export and download results – when you have found what you needed; you can export it out of Office 365 for review.
How to Assign eDiscovery Permissions in Microsoft 365
In order to access Core eDiscovery, or to have the ability to add queries to In-Place eDiscovery, a user must be added as a member of the eDiscovery Manager role group in the Office 365 Security & Compliance Center. If a user isn’t a member of this permission group, they will not be able to undertake eDiscovery.
Members of the eDiscovery Manager role group will be able to complete all the actions required for Core eDiscovery, including creating and managing Core eDiscovery cases, adding and removing members, placing an eDiscovery hold on users, creating new queries, and exporting content from the eDiscovery case.
Adding users to the eDiscovery Manager role group is simple, especially when you follow these step-by-step instructions:
- First things first, head to the Office 365 Security & Compliance Center and sign in using the admin account credentials for your organization.
- Navigate to the ‘Permissions’ page and click on the ‘eDiscovery Manager’ role group.
- Now you are on the eDiscovery Manager page, click ‘Edit’ next to the ‘eDiscovery Manager’ section.
- Next, click ‘Choose eDiscovery Manager’ on the ‘Choose eDiscovery Manager’ page.
- Click ‘Add’ and select the appropriate checkboxes for the users you would like to add to the eDiscovery Manager role group.
- Next, click ‘Add’ to add the users you have selected. Then click ‘Done’.
- Save the changes to add your selected users to the role group and click ‘Close’ to complete.
How to Create In-Place eDiscovery Hold in Microsoft 365 Security and Compliance Portal
Now your selected users have the appropriate permissions required to complete eDiscovery, you can create an In-Place Hold in the Office 365 Security and Compliance Portal. Follow this step-by-step guide to find out how:
1. In the Office 365 Security and Compliance portal, navigate to the eDiscovery section. Once on the eDiscover page, click ‘Create a Case’.
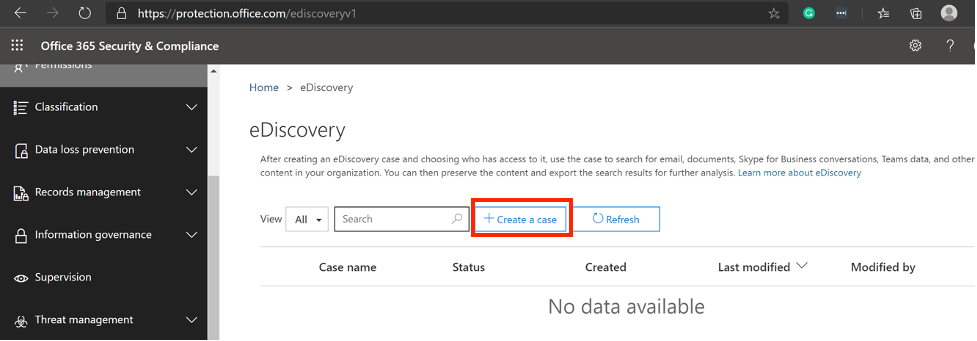
2. Once you have created a case, navigate to ‘Holds’. Once on the ‘Holds’ page, click ‘Create’.
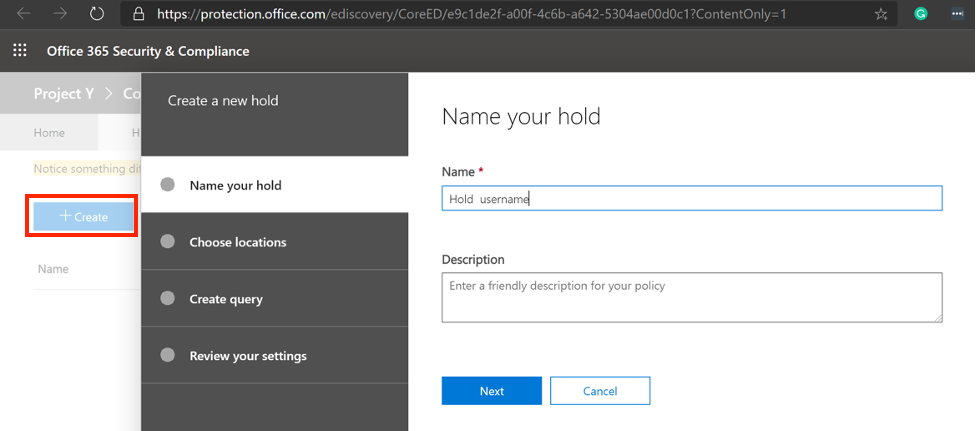
3. Now you need to select the conditions of your Hold. This includes which users will be placed under hold and the locations the hold will apply to. If necessary, you can also add a hold to a Microsoft 365 Group, however, other group types are not currently supported.
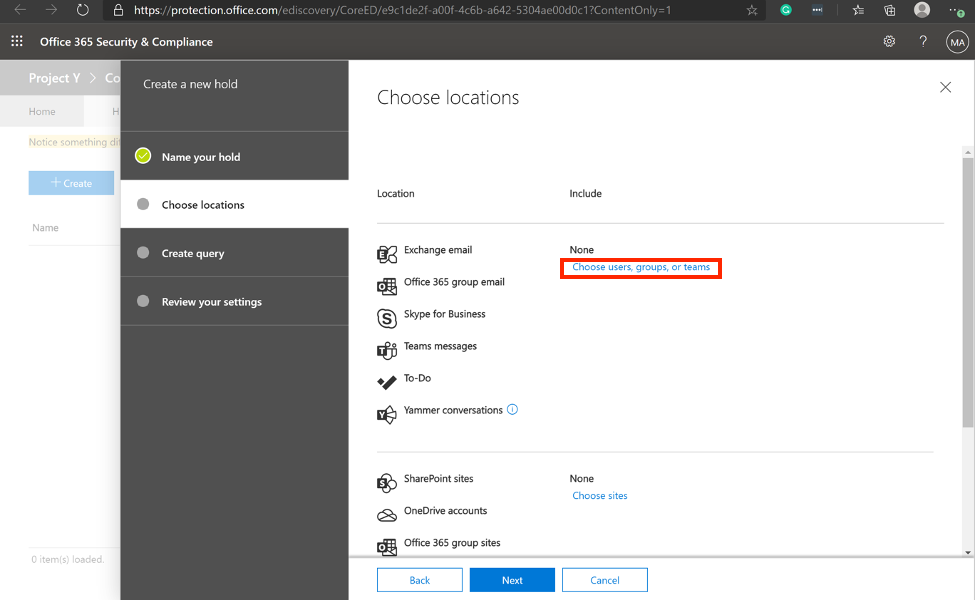
Leave the query conditions blank and hit Next.
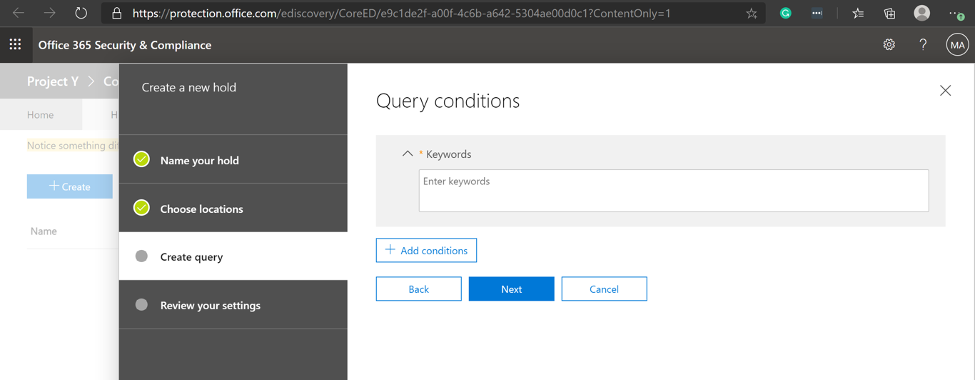
Finally, you can review your Hold settings and conditions and save to create the Hold once you are happy with it. When you have created a Hold, it can still be edited and new users or Microsoft 365 groups can be added.
You will be able to clearly see when you have a user on hold as it will show up on their profile as shown in the screenshot below. In the circumstance that you need to remove the users license when they are on hold, that is absolutely fine. You can remove the users license and their user mailbox will still be retained.
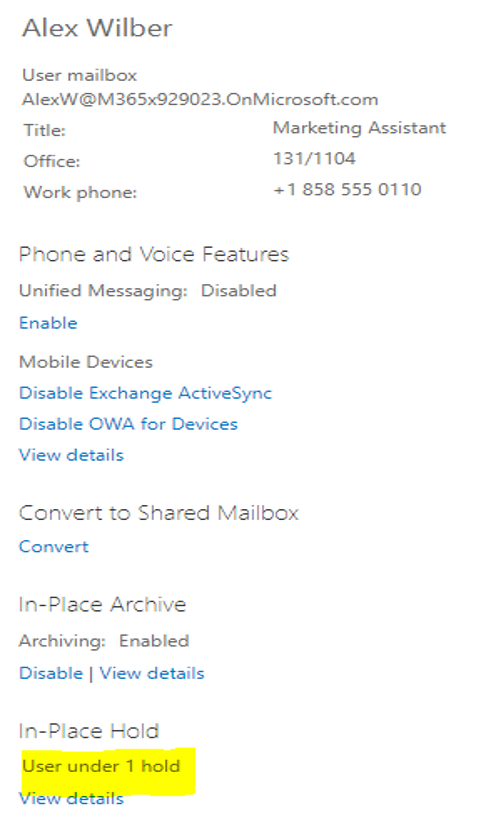
As long as the user is part of an In-Place Hold, their mailbox can remain active without an Exchange Online License. However, you will need to ensure that their mailbox password is changed and/or their sign-in is blocked to limit access to their mailbox.
Need help with your eDiscovery Plan?
Given the recent retirement of In-Place eDiscovery and In-Place Hold, it’s important to ensure you are aware of the new eDiscovery set-up for your environment and to know whether or not they are still supported, such as in Exchange Server and Exchange Hybrid deployments of In-Place eDiscovery.
If you need help with how to move forward with eDiscovery following the retirement of In-Place eDiscovery and In-Place Hold, get in touch with Steeves and Associates today. Our team of Microsoft 365 and Exchange experts will be happy to help you find the best path forward.

